| Plans | ⱱ Forever Free | ⱱ Scale | ⱱ Enterprise |
| User roles | ⱱ Reader | ⱱ Writer | ⱱ Admin |
|
|
|
|
 Why?
Why?
Have your contextual suggestions shown at all times in the linked url's by installing and switching on the Whale Web Extension. It can also be used to find and browse through content at any given time without leaving the webpage you are on. This can be particularly handy when are working in a certain flow.
You don't need to leave your page to find what you need. It only speeds up the process and leads to less frustration!
 How?
How?
Install Whale CoPilot as a single user
Adding the extension is a huge plus to optimizing Whale's potential for increased efficiency and access to information from your workflow.
How to add the plugin in Google Chrome and Brave Browser (Microsoft Edge see underneath):
- Install the plugin via the following link.
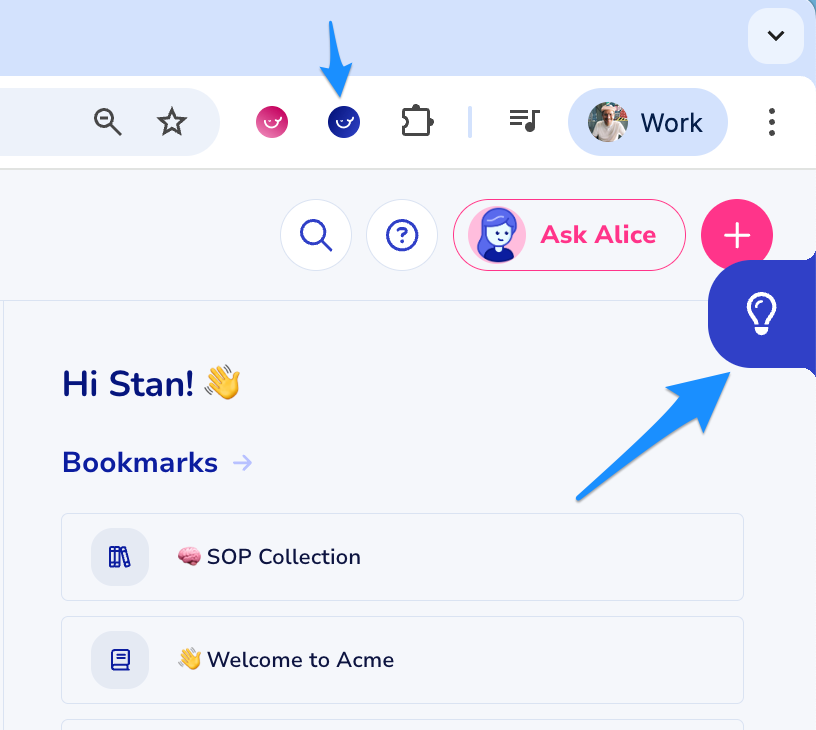
- Login: After the installation, you'll find the Whale icon in the upper right corner of your browser. Log in with your Whale credentials.
- Use: A blue ribbon with a light bulb appears. Our extension provides you with content and suggestions based on the content that is created and saved in the Whale workspace.
![]()
How to add the plugin in Microsoft Edge (make sure you have the latest updated version of Edge):
- Install the plugin via the following link.
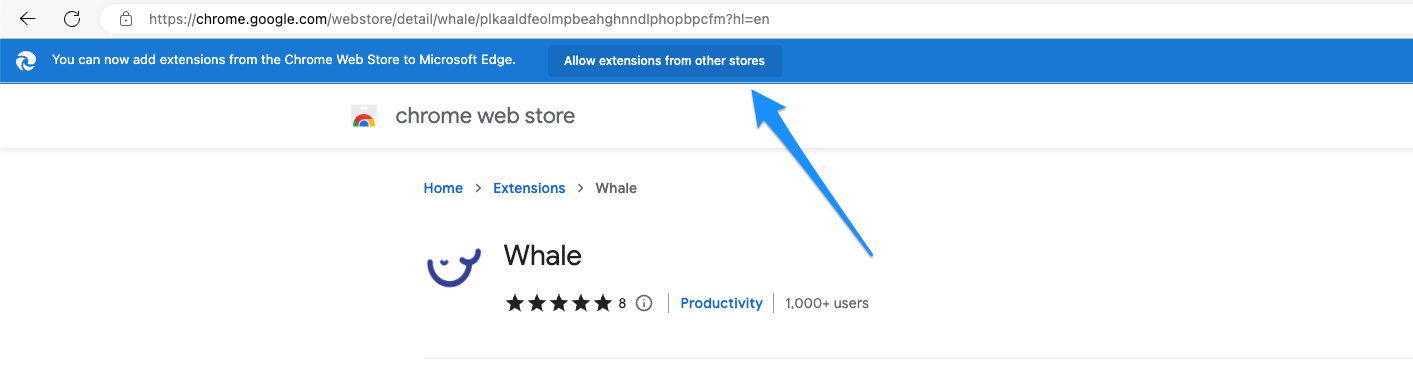
- Before you can install the link you have to allow Chrome extensions for Microsoft Edge. If this is your first extension you will see the following screen.


- Login: After the installation, you'll find the Whale icon in the upper right corner of your browser. Log in with your Whale credentials.
- Use: A blue ribbon with a light bulb appears. Our extension provides you with content and suggestions based on the content that is created and saved in the Whale workspace.

The web extension recognizes the URL and a specific word. This is how the extension is able to provide Suggestions for your team to continue their work without being disturbed.
![]()
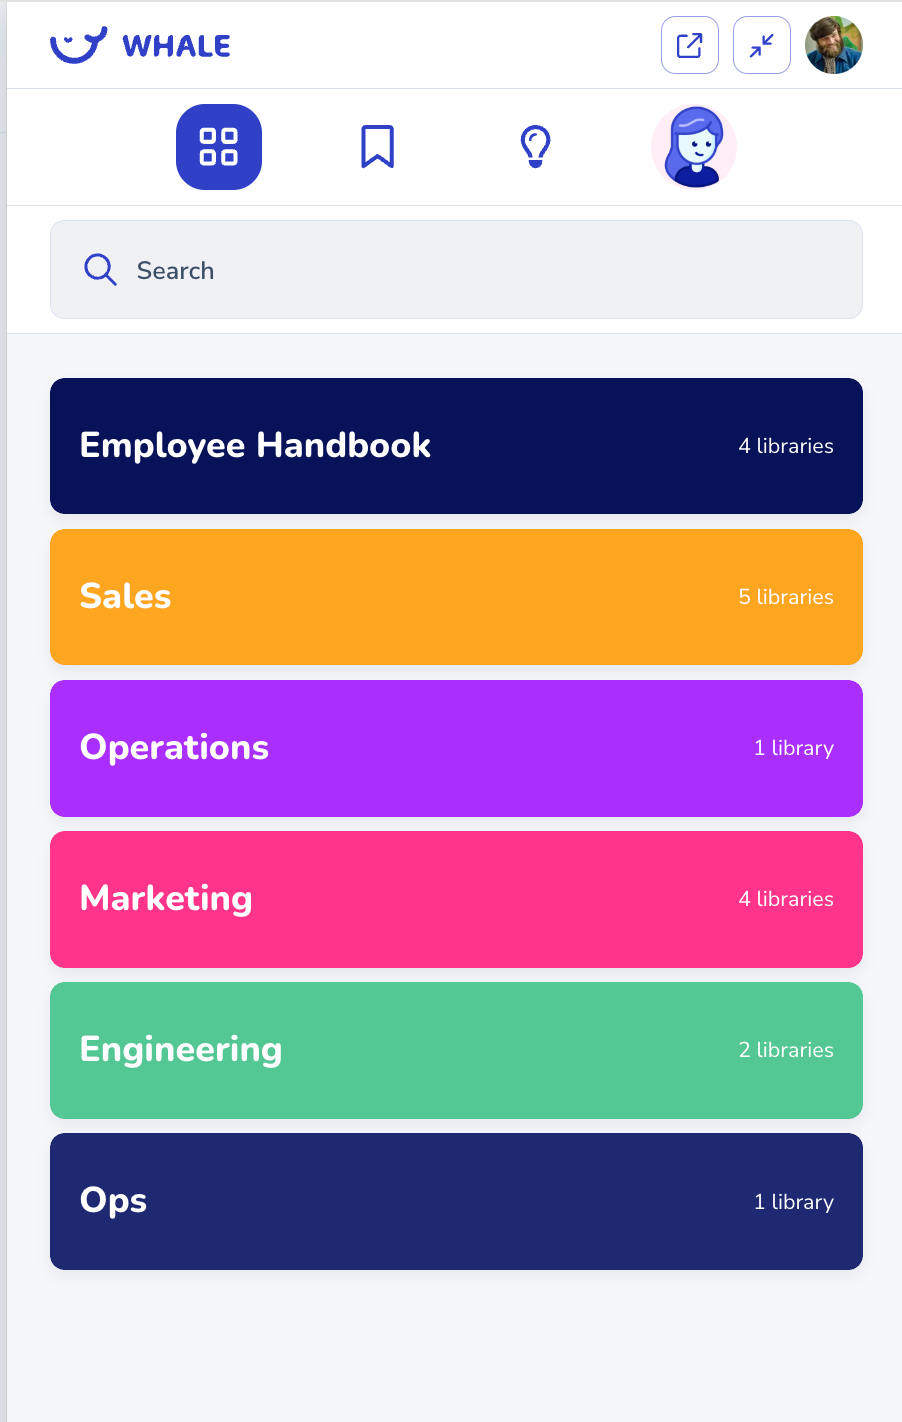
Team members can walk through the entire procedure without changing the interface or switching tools:
![]()
The Web extension also enables you to:
- Search for information with the search bar
- Bookmark the playbook
- Copy the content
Install the web extension for all users company wide (Google Suite)
Force install Whale extension
These steps assume you're familiar with configuring Chrome settings in your Admin console.
- In your Google Admin console (at admin.google.com)...
- Go to Devices > Chrome.
- Click Apps & extensions > Users & browsers or Managed guest sessions.(if you can't see the app yet, add it via the yellow + and the Google Chrome icon at the bottom of your screen)
- To apply the setting to all users and enrolled browsers, leave the top organizational unit selected. Otherwise, select a child organizational unit.
- Go to the Whale extension
- Under Installation policy, choose Force install + pin.
- Click Save. If you configured a child organizational unit, you might be able to Inherit or Override a parent organizational unit's settings.

Install the web extension for all users company wide (Office 365)
Set Chrome app and extension policies (Windows).
Applies to Windows users who sign in to a managed account on Chrome browser.
As an administrator, you can automatically install Chrome apps and extensions on users' computers. You can also control which apps or extensions users can install. You set the default policies for all apps and extensions. Then, if you want to customize policies for specific apps or extensions, you can override your defaults.
Step 1: Review the policy
| Policy | Description and settings |
| ExtensionSettings | Manage the apps and extensions users can install.
Overrides the following extension policies (which might already be set):- ExtensionAllowedTypes
- ExtensionInstallBlocklist
- ExtensionInstallForcelist
- ExtensionInstallSources
- ExtensionInstallAllowlist
|
Step 2: Update your Group Policies
In your Microsoft Windows Group Policy Editor (Computer or User Configuration folder):
- Go to Administrative Templates > Google > Google Chrome > Extensions.
- Open Extension management settings.
Tip: If you don’t see the policy, download the latest policy template. - Enable the policy and enter its compact JavaScript Object Notation (JSON) data in the text box.
Note: Enter JSON data as a single line with no line breaks. You can use this third-party JSON compression tool to validate policies and compact them into a single line (example JSON data below). - Set your desired app and extension policies (details below).
| Example JSON data |
{
""*"": {
""runtime_blocked_hosts"": [""*://*.example.com""],
""blocked_permissions"": [""usb""]
}
} |
| Compact JSON data |
| {""*"":{""runtime_blocked_hosts"":[""*://*.example.com""],""blocked_permissions"":[""usb""]}} |
Step 3: Get Chrome app or extension IDs
Skip this step if you're not going to customize policies for specific apps or extensions.
To apply policies and settings to a specific Chrome app or extension, you need to identify it. Every app and extension in the Chrome Web Store has its own unique identification (ID) that doesn’t change across versions. So, if a user installs a specific app or extension on multiple devices, it has the same ID on all devices. Each ID is 32 characters long.
To find an app or extension ID:
- Open the Chrome Web Store.
- Find and select the app or extension you want.
- Look at the URL. The ID is the long string of characters at the end of the URL.
For example, nckgahadagoaajjgafhacjanaoiihapd is the ID for Google Hangouts.
Step 4: Set app and extension policies
For each implementation (sample code below):
- Set a default policy that applies for all apps and extensions. Use the * value.
- (Optional) Customize the policy for individual apps or extensions. Use the app or extension ID (details above).
 Video
Video
--
 If you landed on this page while looking for information on documentation and training software you can navigate to our main webpage --> usewhale.io/